Features when holding meetings
How to add files when planning an event
In this article, you will learn how to add files when planning an event on the VKURSE platform.
In our application, you can easily add files to the storage during the event. This allows you to instantly share important content and prepared materials with colleagues and participants.
Let's look at how to add files when planning an event.
STEP 1: In the event planning functionality, learn more about this feature in this article, select the Files tab.
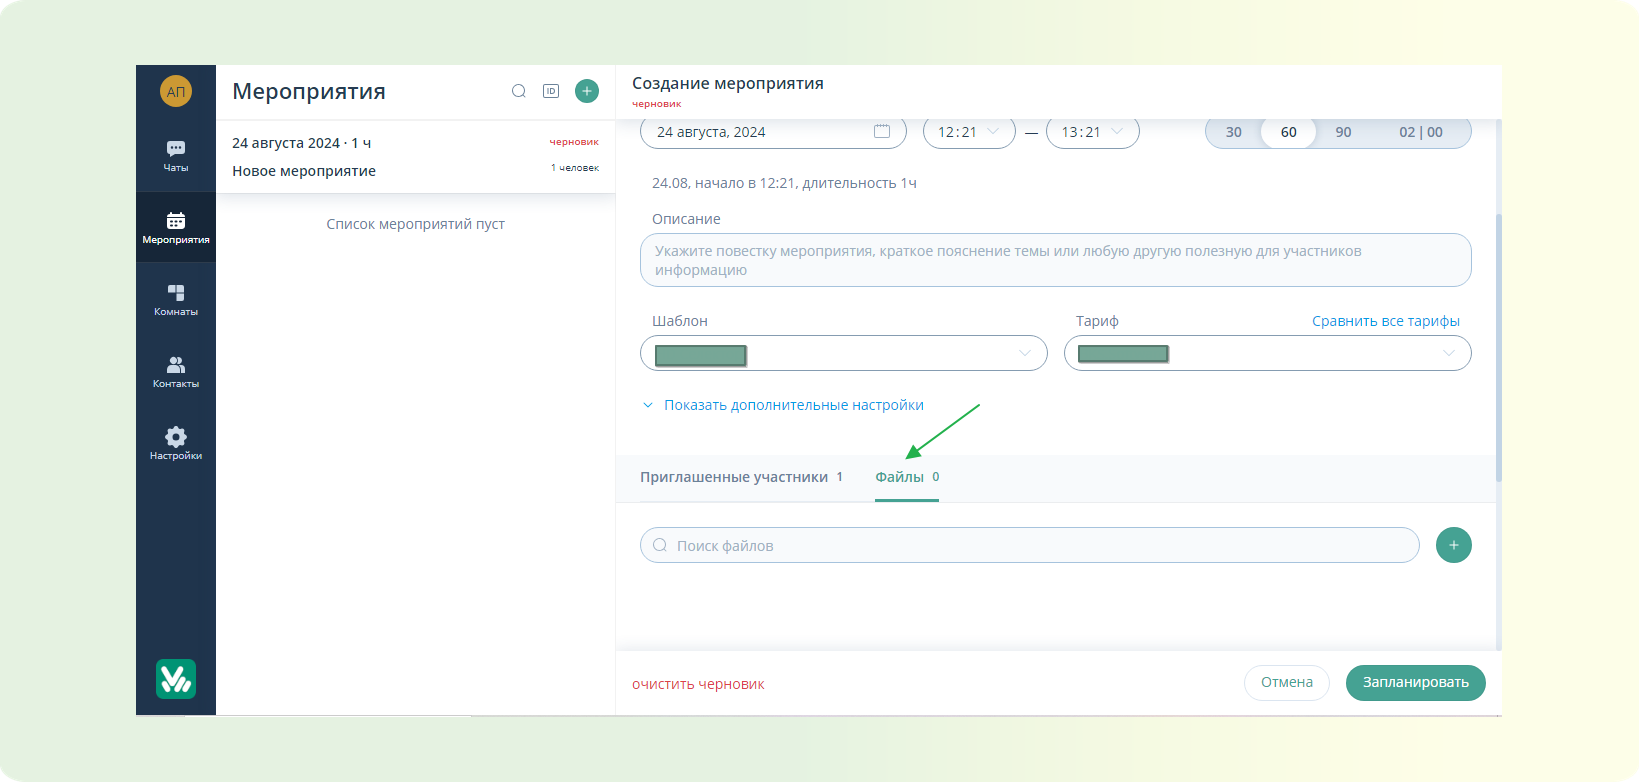
STEP 2: Click on the "Upload file" button (green plus) - The operating system window will open to select the file.

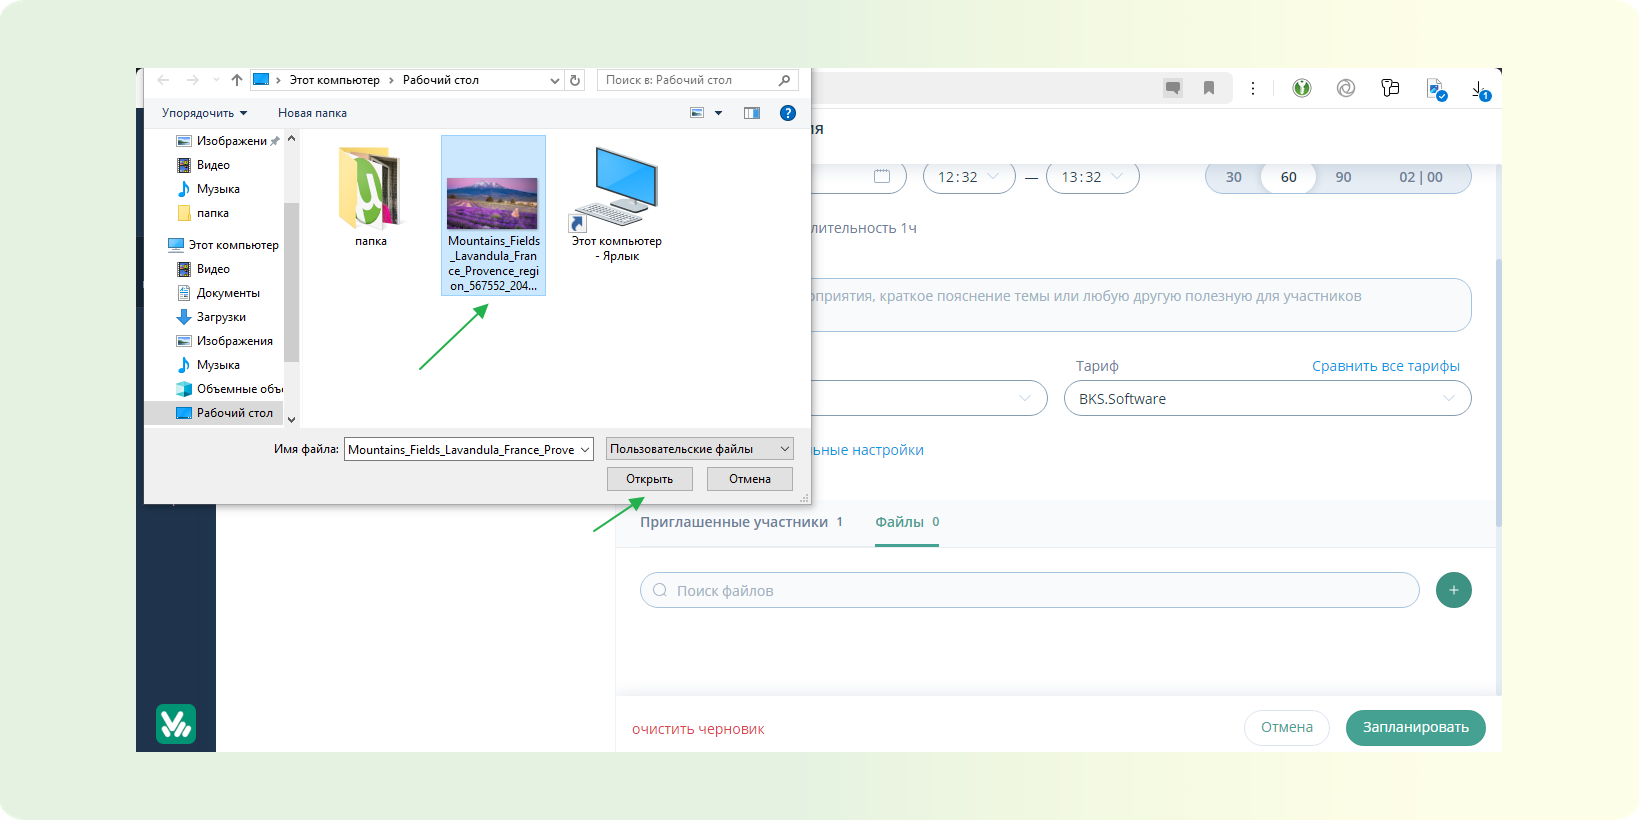
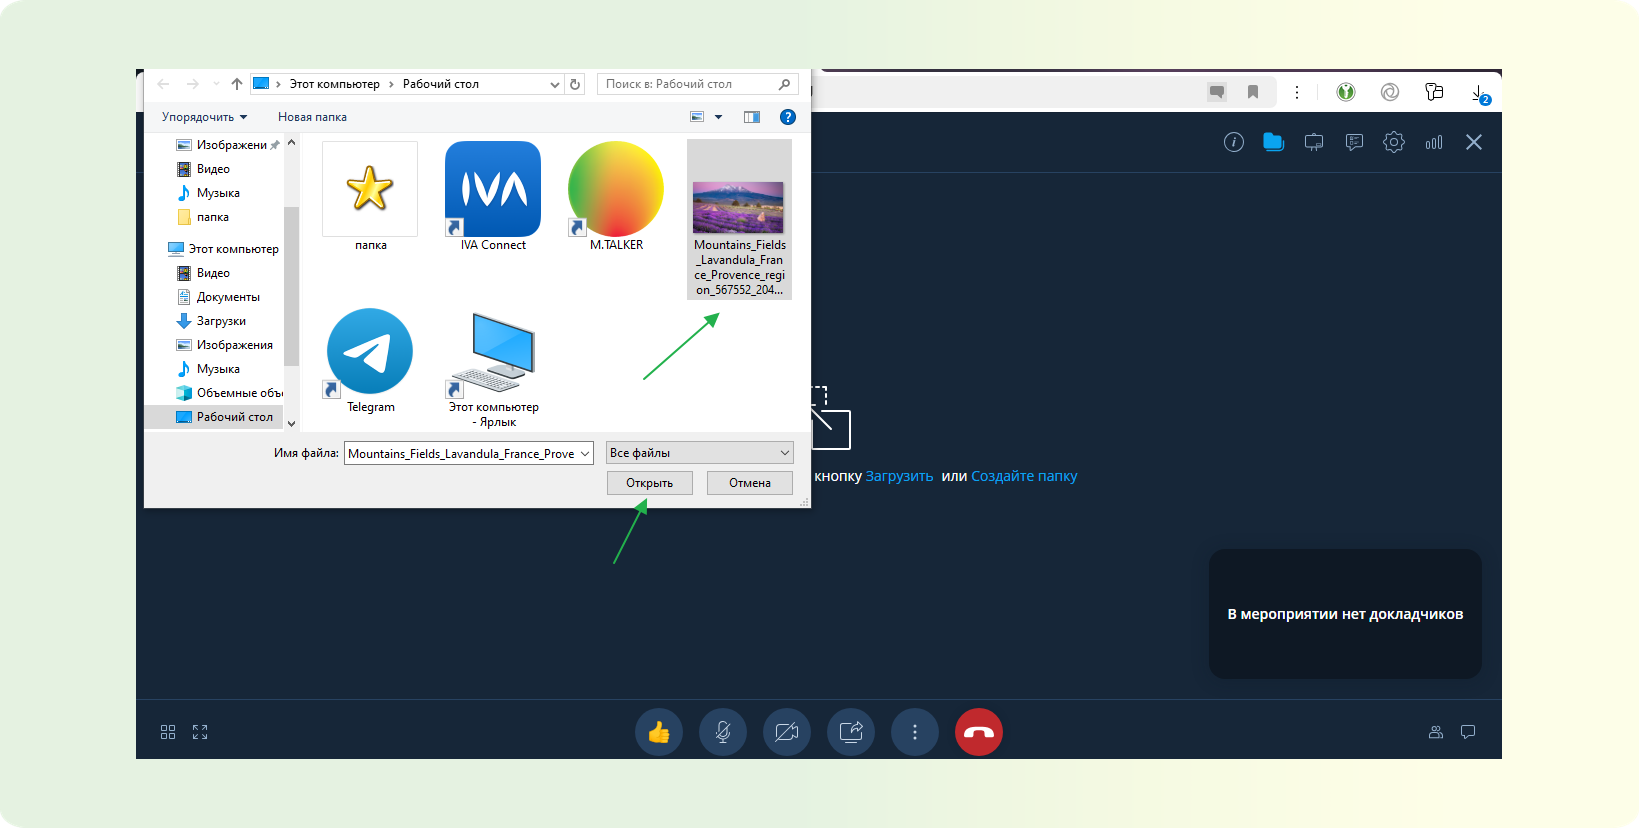
STEP 3: Open the folder where your file is located - Click on it - Click the "Open" button
IMPORTANT
The VKURSE platform supports the "Drag and drop" function - which means you can drag the file with the mouse cursor and drop it into the necessary file upload area.
STEP 4: Depending on the file size, you may need to wait for the conversion to finish. If the file is small in size, this process is instantaneous. After that, you can display this file to the participants. Learn more about demonstrating content on the VKURSE platform in this article.
How to add a file during an event
In this article, you will learn how to upload files during an event on the VKURSE platform.
In our application, you can easily add files to the storage during the event. This allows you to instantly share important content and prepared materials with colleagues and participants.
Let's look at how to add files during an event.
STEP 1: On the top event management panel, find the "Files" button
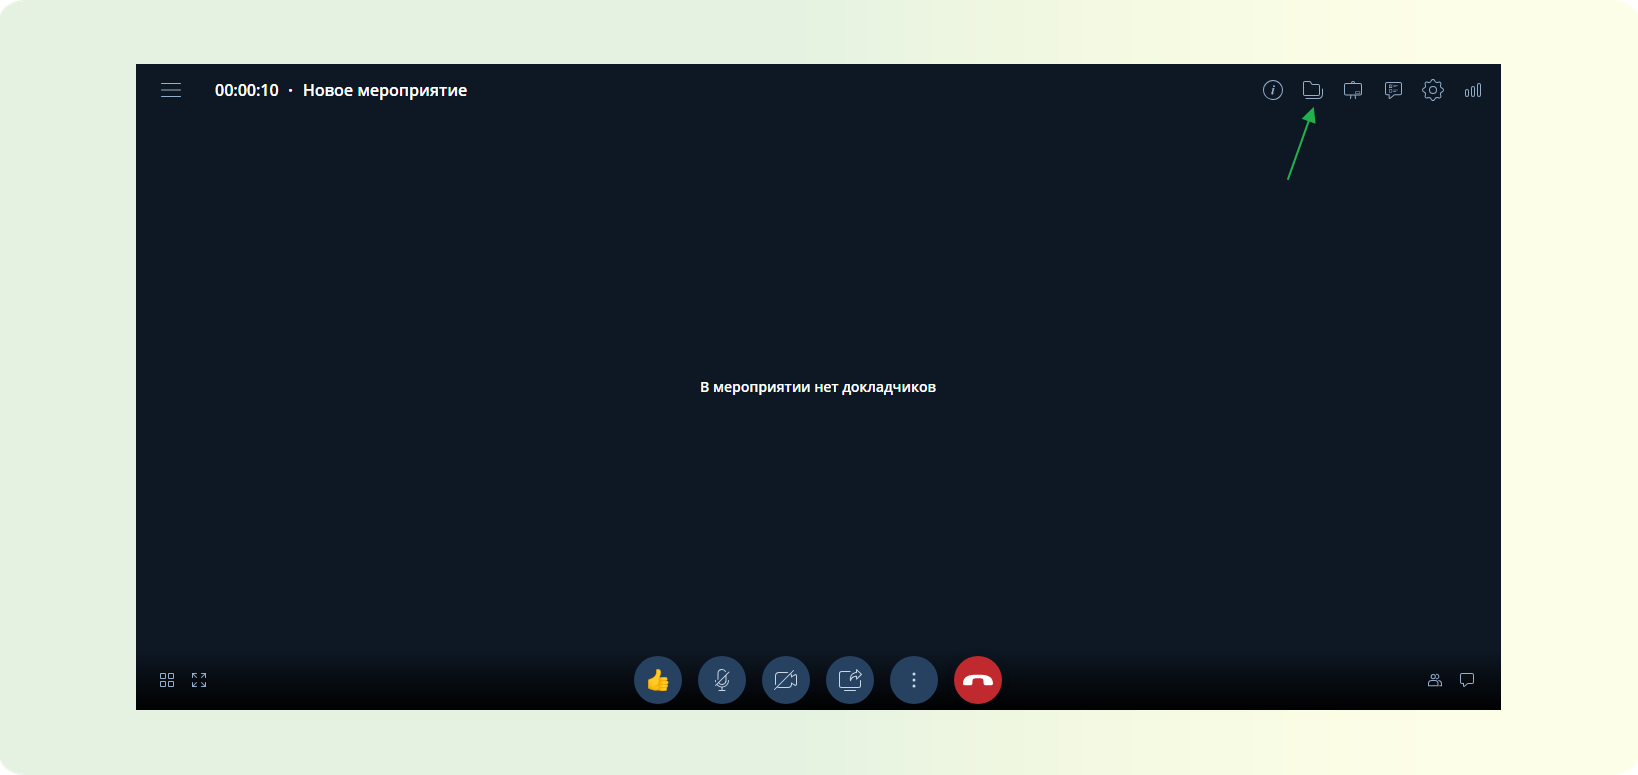
STEP 2: Click on this button - The event file storage will open, learn more about the "Files" feature in this article.
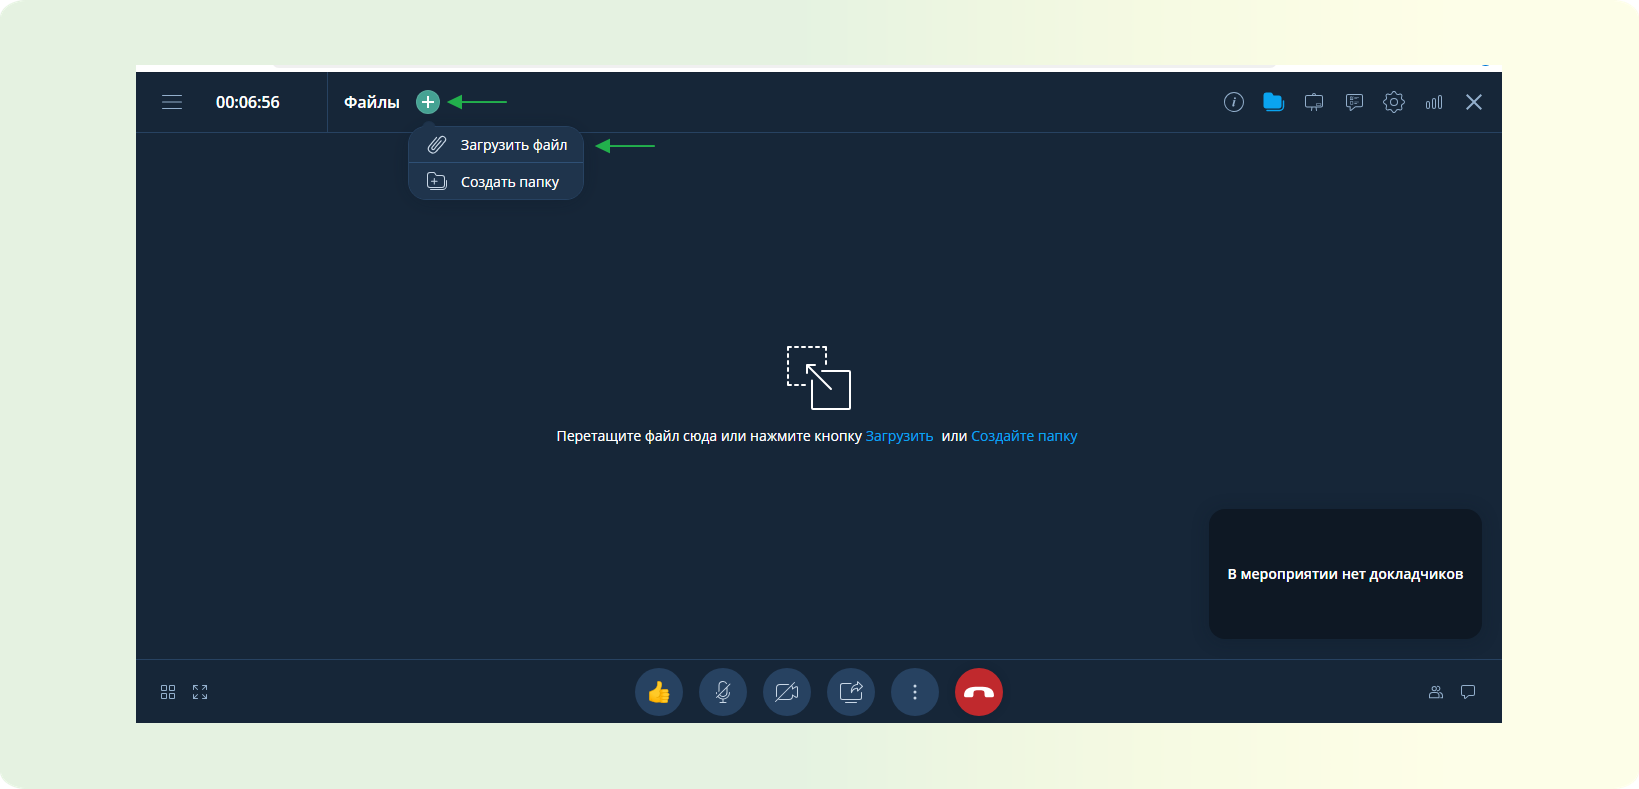
STEP 3: Click the "Add file or folder" button (green plus) - In the list that appears, choose "Upload file" - The operating system window will open to select the file.
IMPORTANT
For convenience, the VKURSE platform has a feature to create folders in the event storage - this is necessary for you to easily group various files within the event. Learn more about this feature in this article.
STEP 4: Open the folder where your file is located - Click on it - Click the "Open" button
IMPORTANT
The VKURSE platform supports the "Drag and drop" function - which means you can drag the file with the mouse cursor and drop it into the necessary file upload area.
STEP 5: Depending on the file size, you may need to wait for the conversion to finish. If the file is small in size, this process is instantaneous. After that, you can display this file to the participants. Learn more about demonstrating content on the VKURSE platform in this article.
How to enable recording at an event
In this article, you will learn how to enable recording at an event on the VKURSE platform.
Our application offers the function of event recording. Event recording opens up new horizons for your communication and collaboration. This feature allows you to capture important moments in audio and video format, giving participants the opportunity to revisit key discussions and recordings at any convenient time. Thanks to recording, you can easily share materials with colleagues or participants who could not attend the meeting, providing full access to information and opportunities for deeper analysis and discussion.
Let's look at all the ways to enable recording at an event.
METHOD 1: Manual event recording activation.
STEP 1: Go to the previously created event. Learn more about creating events of different types in this article.
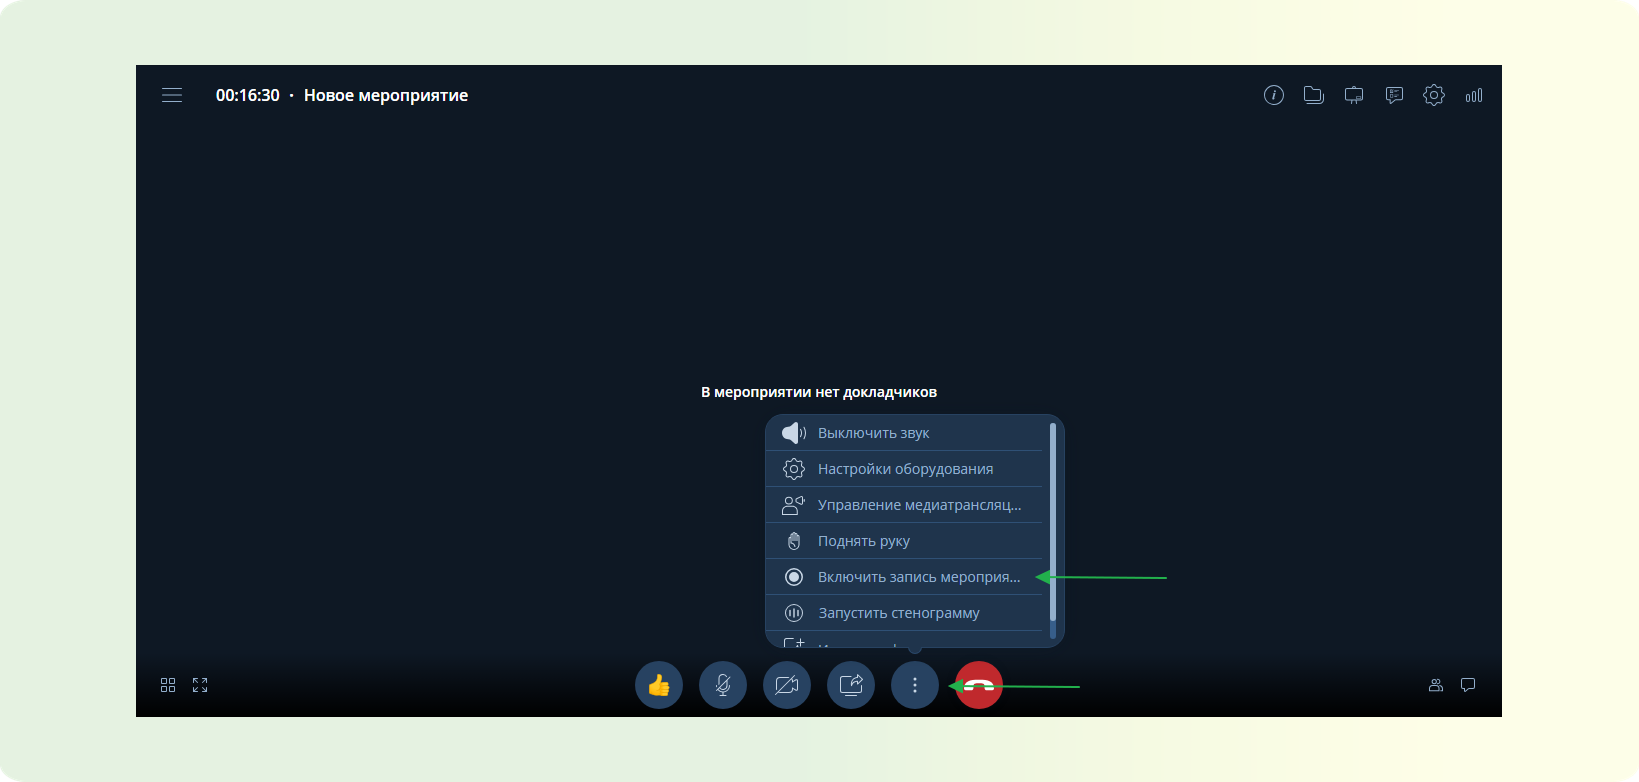
STEP 2: On the lower event management panel, find the three vertical dots. In the list that appears, click on "Enable event recording."
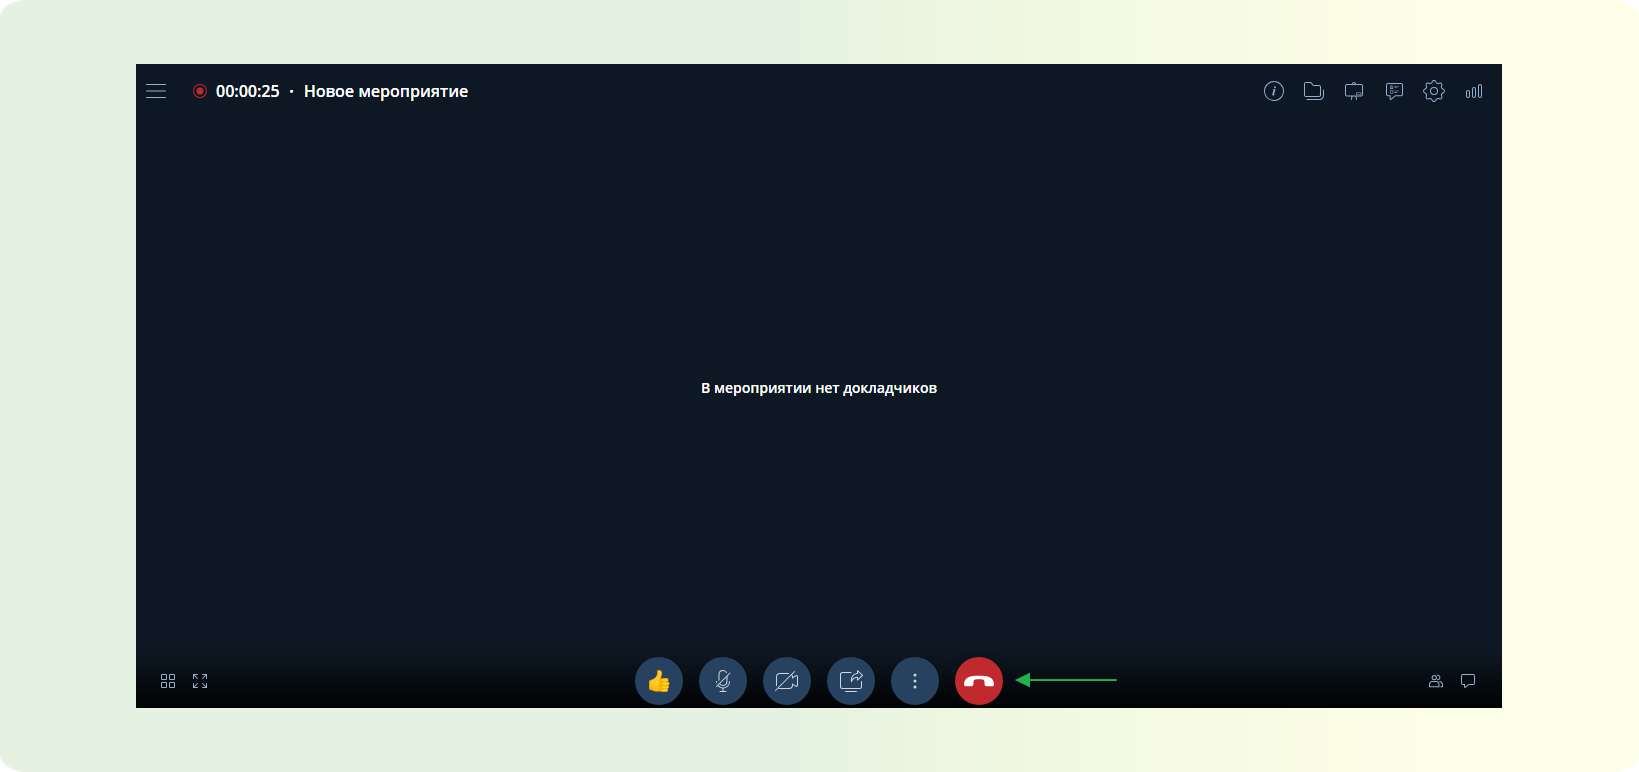
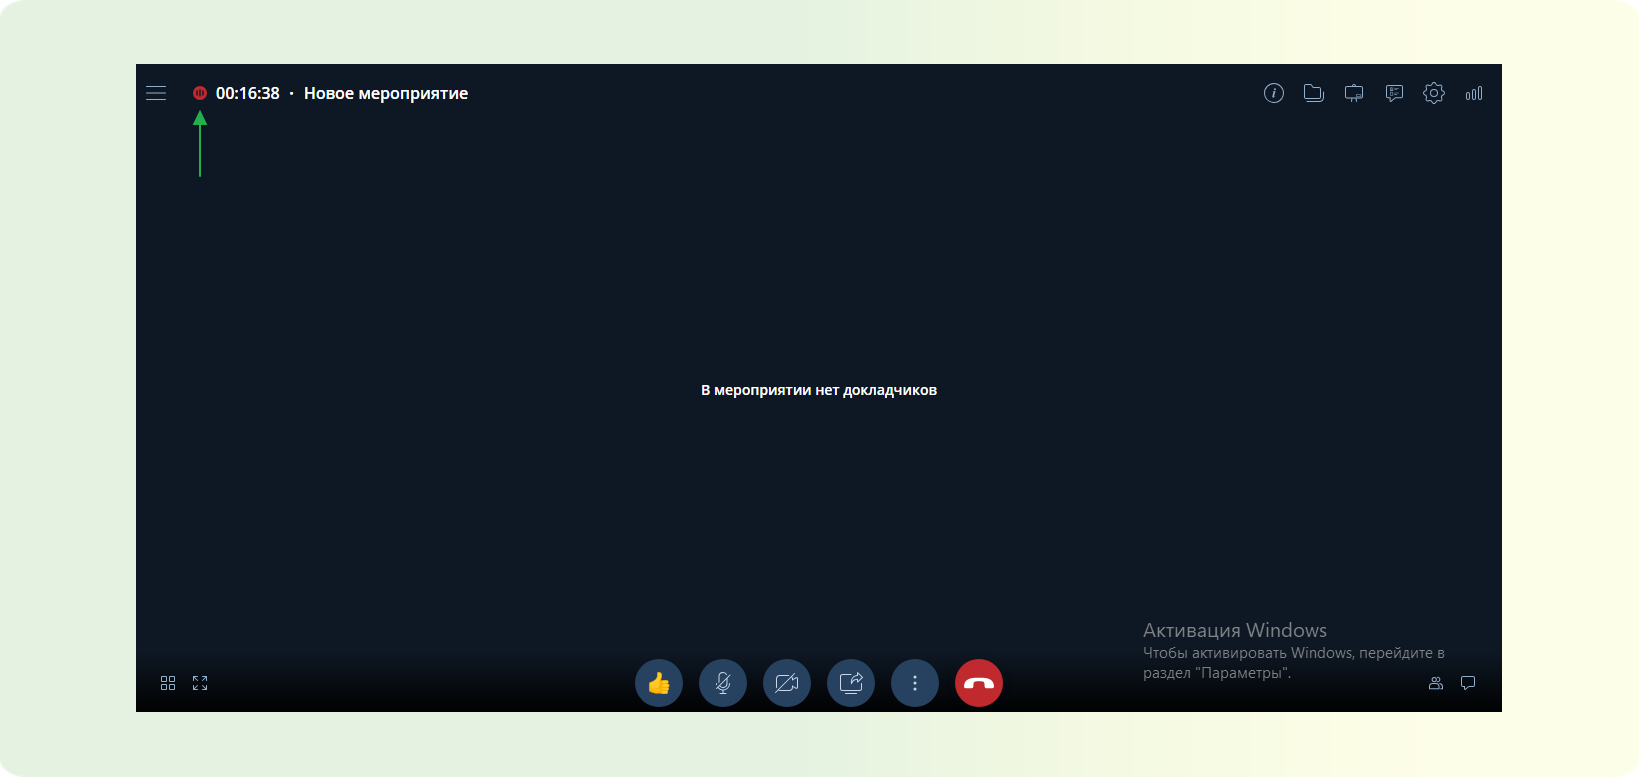
STEP 3: After enabling recording, a red circle will appear next to the timer in the upper left corner of the control panel, indicating that the recording is in progress.

METHOD 2: Automatic event recording activation.
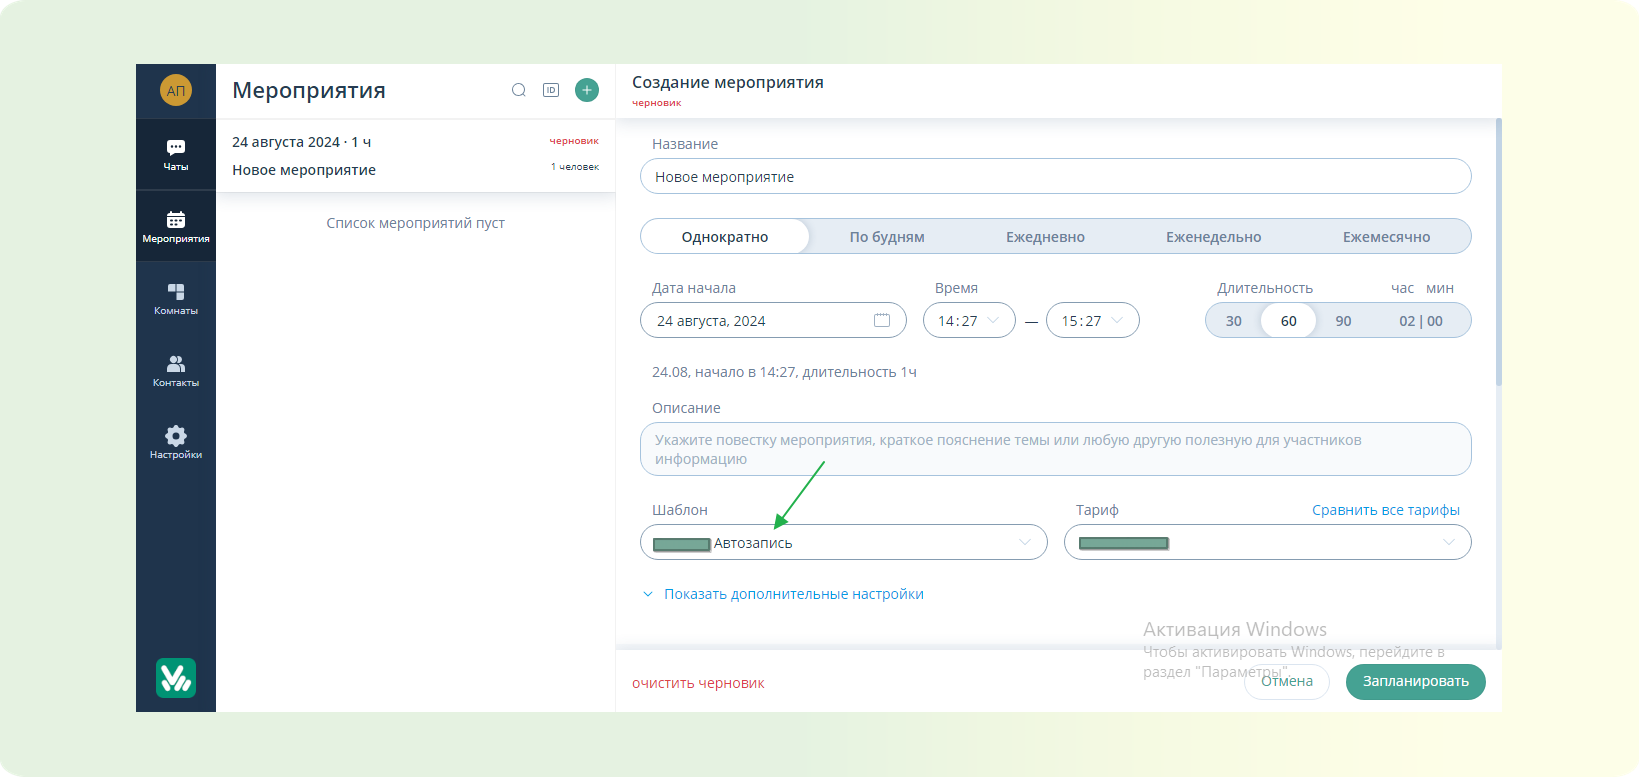
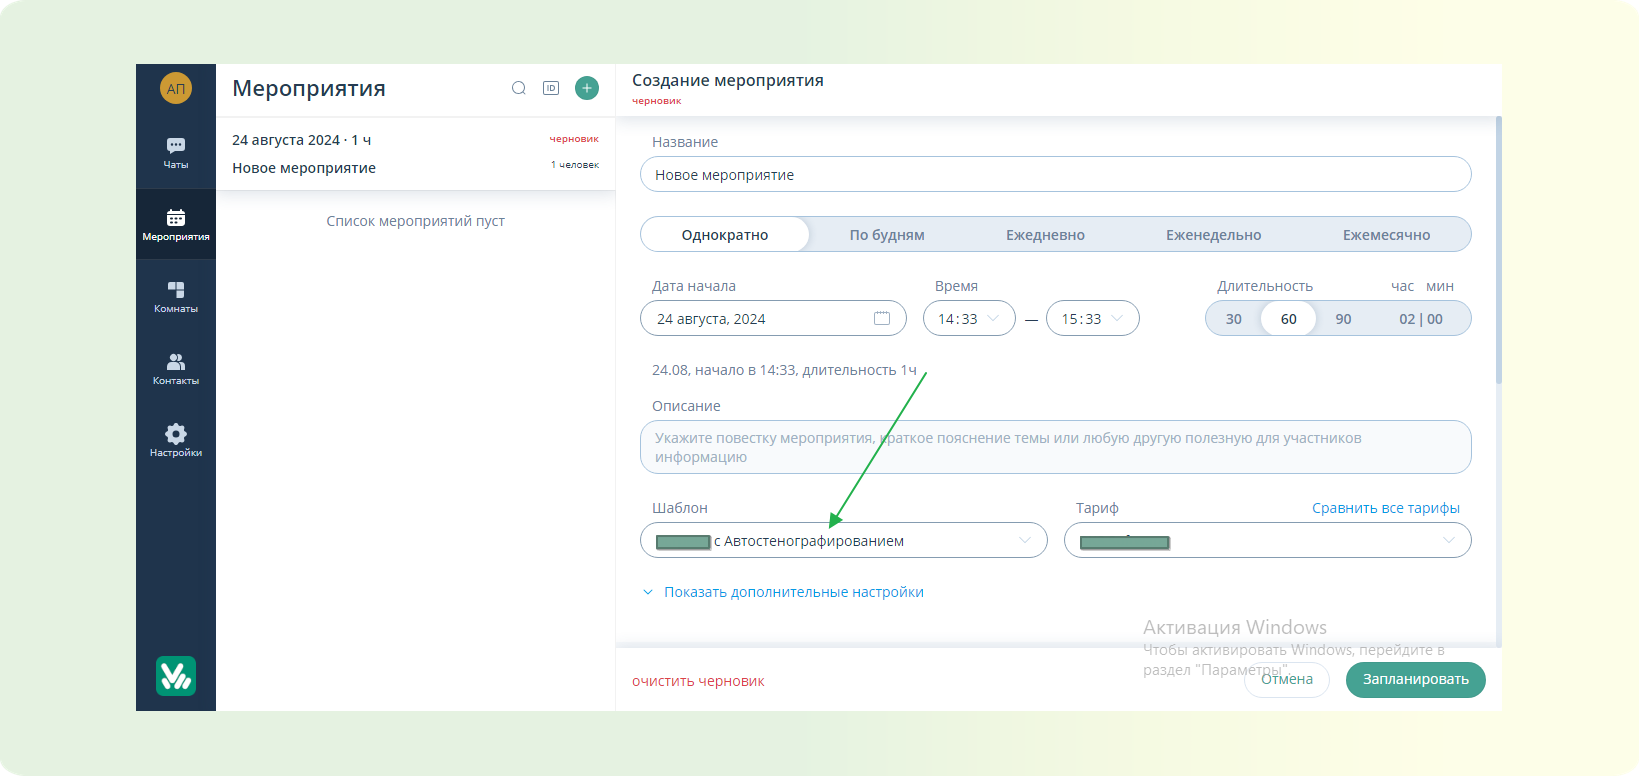
STEP 1: When creating an event, select the event template with the label "Auto-record." Learn more about creating events of different types in this article.
STEP 2: After starting the event, the recording will be automatically enabled.
STEP 3: After enabling recording, a red circle will appear next to the timer in the upper left corner of the control panel, indicating that the recording is in progress.
How to disable event recording and get the file.
You can disable event recording in two ways.
METHOD 1: Automatic event recording disable when the event ends.
IMPORTANT
This method only works for regular events. And only if the event is ended by the organizer / moderator. Learn more about the available functionality for the organizer / moderator in this article.
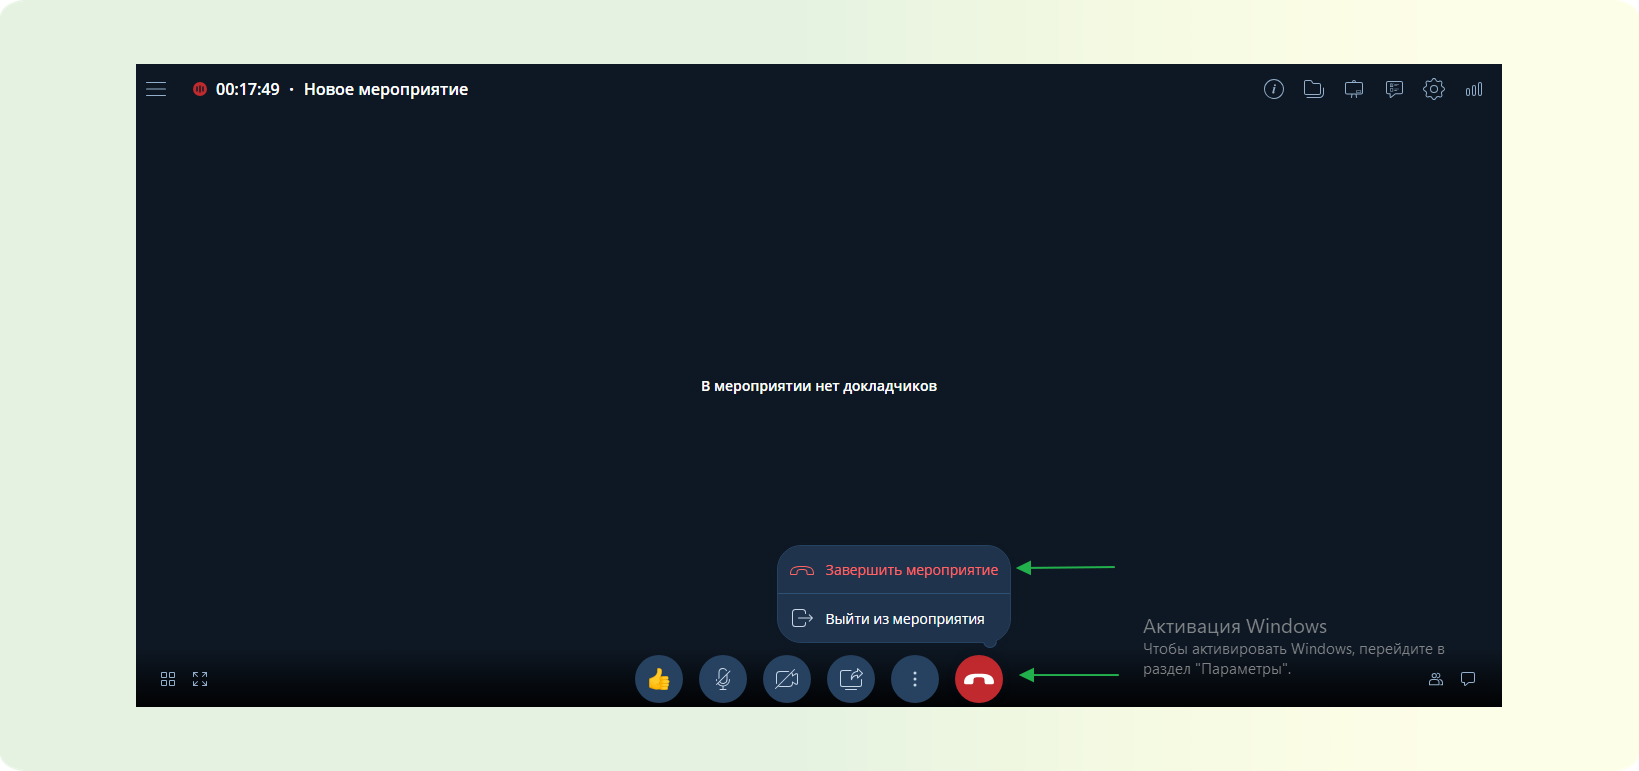
STEP 1: On the lower event management panel, find the red "Exit event" button.
STEP 2: In the list that appears, click on "End event."
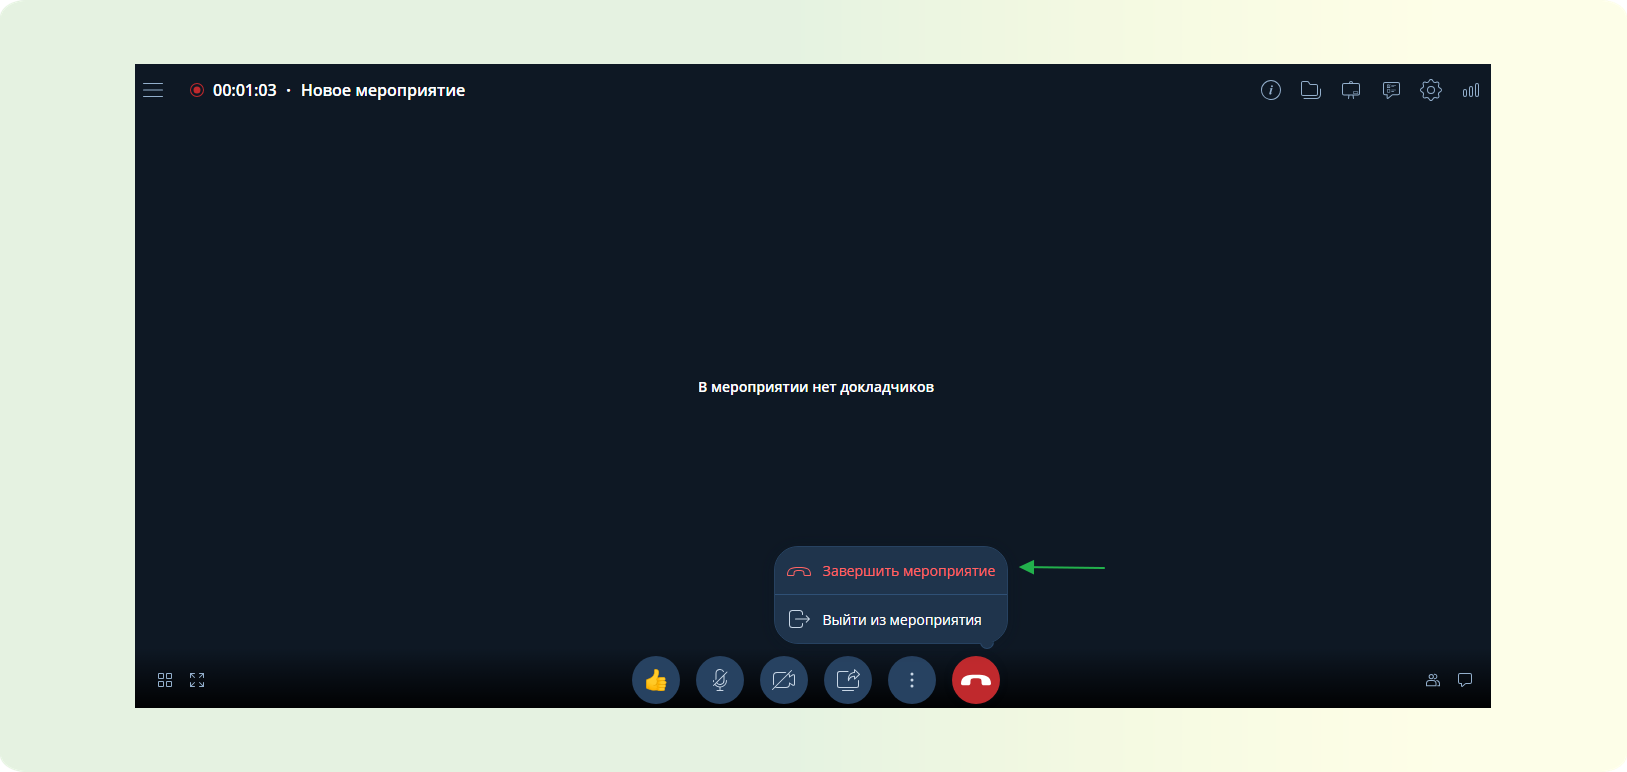
STEP 3: The event will end, the recording will stop. Automatic conversion of the recording file to MP4 format will begin.
STEP 4: After the conversion is complete, the event recording will be available at the following path: Events - Select the desired event in the feed - click on it - click on the "Files" tab - Select the necessary recording - click the three dots next to the name - download or view the recording.
METHOD 2: Manual event recording file disable.
IMPORTANT
This method works in any type of event. Manual event recording disable is only available to the organizer / moderator. Learn more about the available functionality for the organizer / moderator in this article.
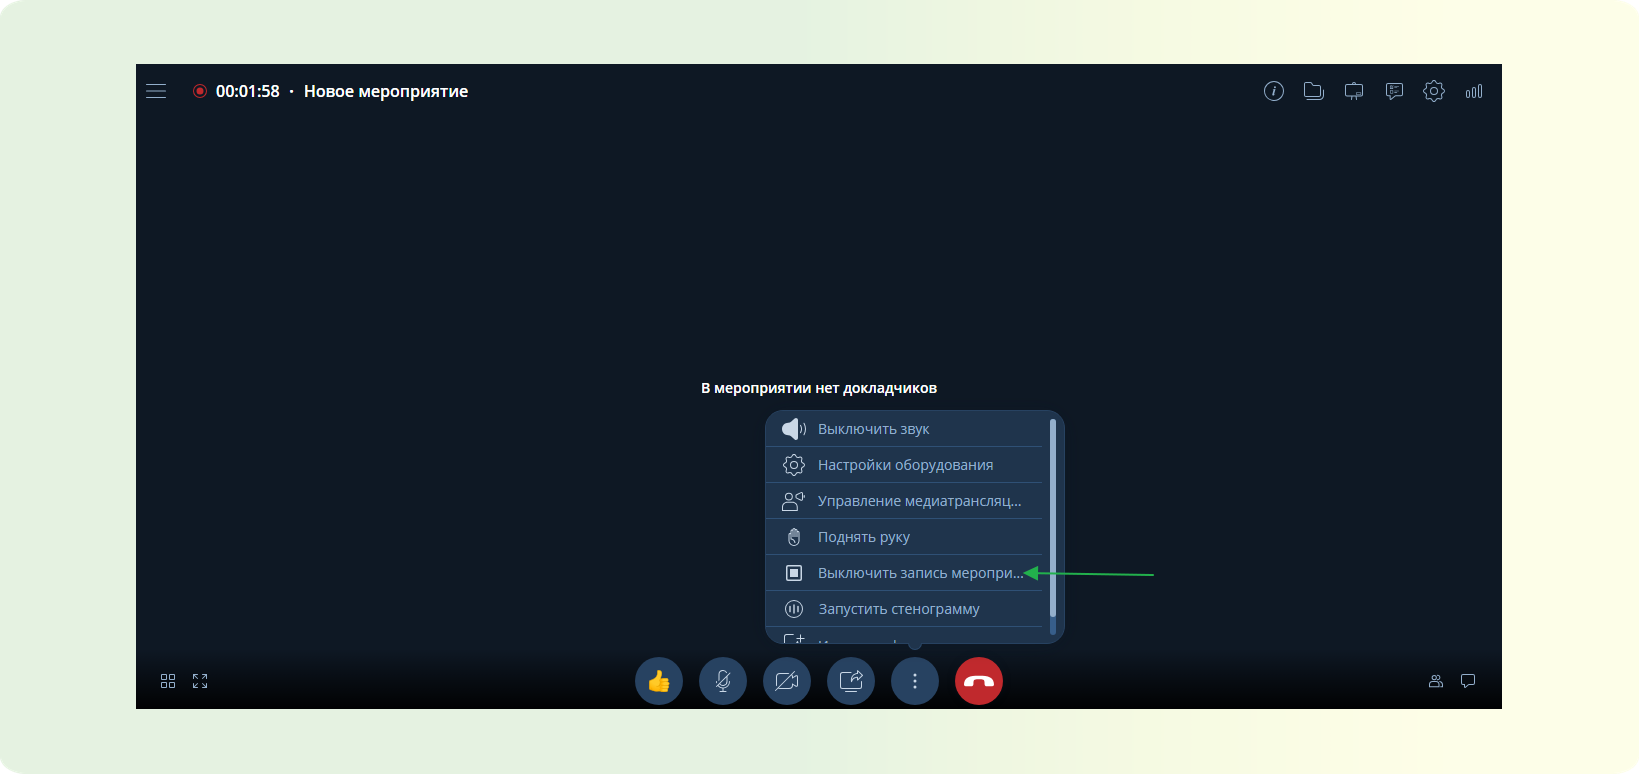
STEP 1: On the lower event management panel, find the three vertical dots. In the list that appears, click on "Disable event recording."
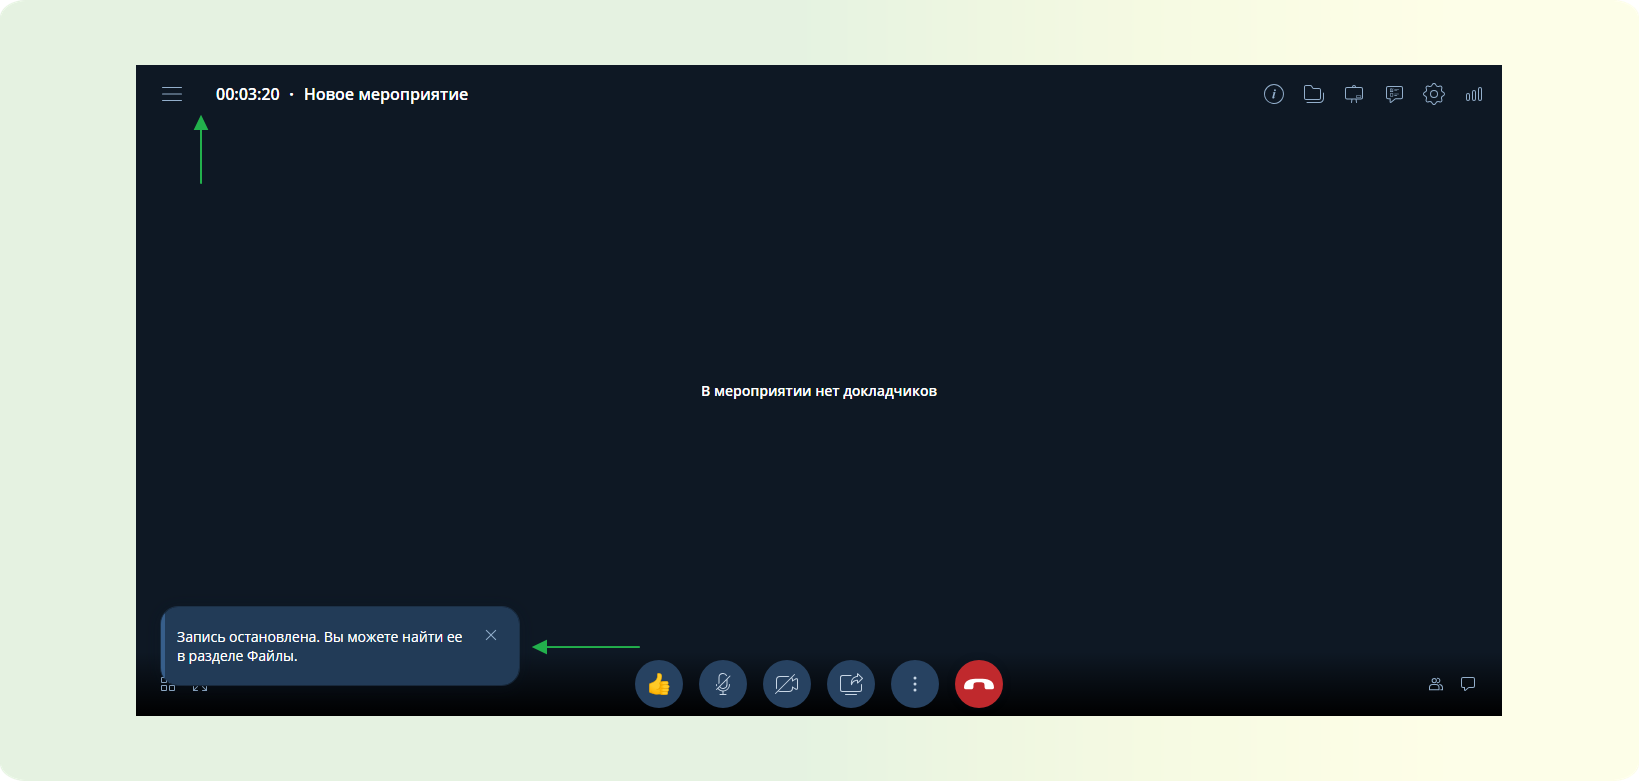
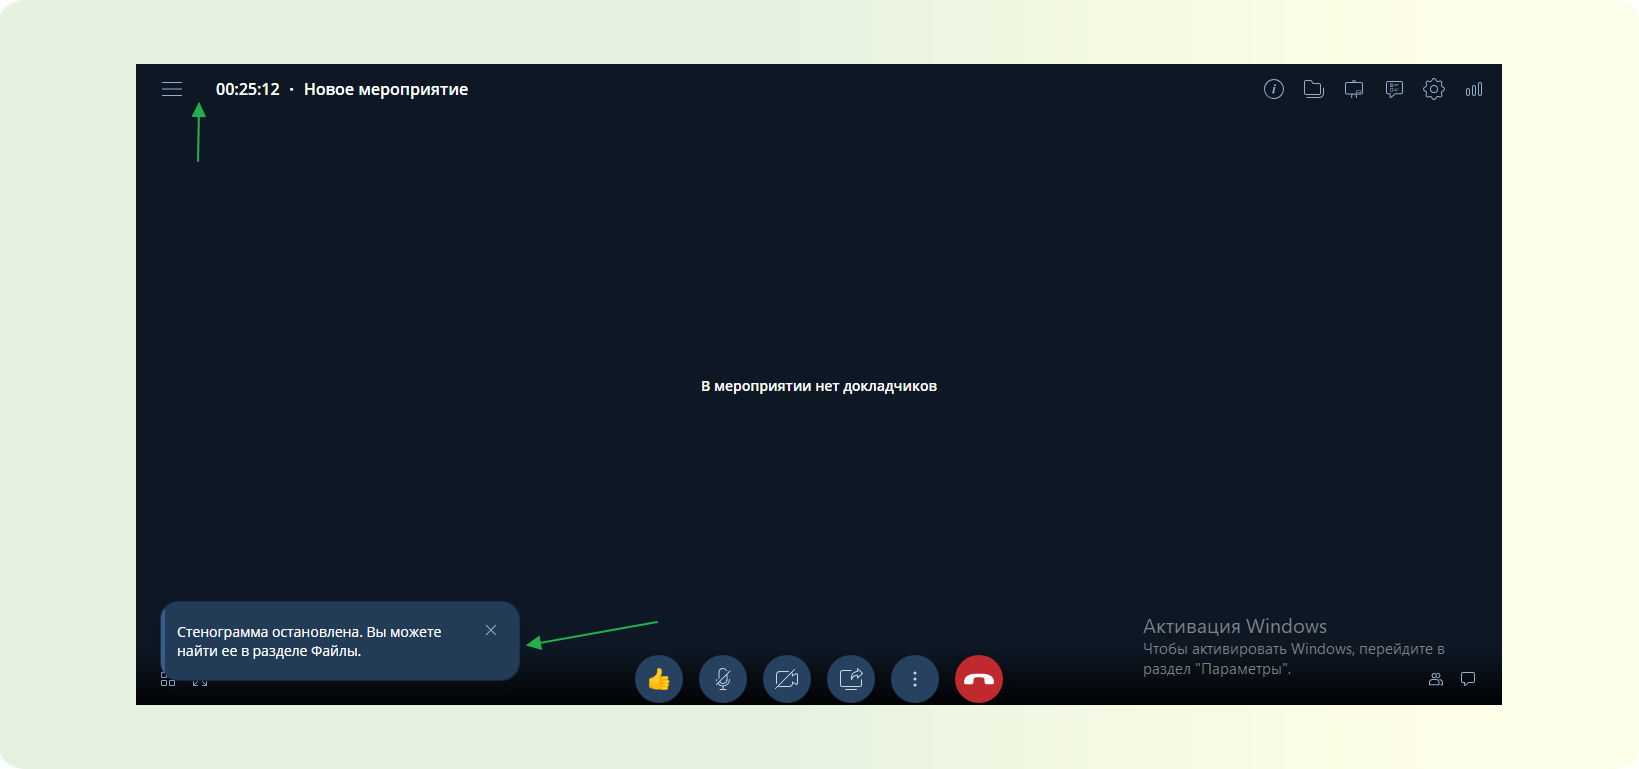
STEP 2: After disabling the recording, the red circle next to the timer in the upper left corner of the control panel will disappear, indicating that the recording has stopped. A corresponding notification will appear in the lower left corner.
STEP 3: Wait for the recording conversion to finish.
STEP 4: After the conversion is complete, the event recording will be available at the following path: In the event, go to the file storage, click on the "Files" button - Select the desired recording - click the three dots next to the name - download or view the recording.
How to enable/disable stenography at an event
In this article, you will learn how to enable stenography at events on the VKURSE platform.
Our application offers the function of stenography at events, which is essentially meeting logging. This feature allows you to record important moments in a text format, providing participants with the ability to revisit key discussions at any time. Stenography simplifies the exchange of materials with colleagues and those who could not attend, providing access to important information and detailed analysis.
Let's look at all the ways to enable stenography at events.
METHOD 1: Manual stenography activation at events.
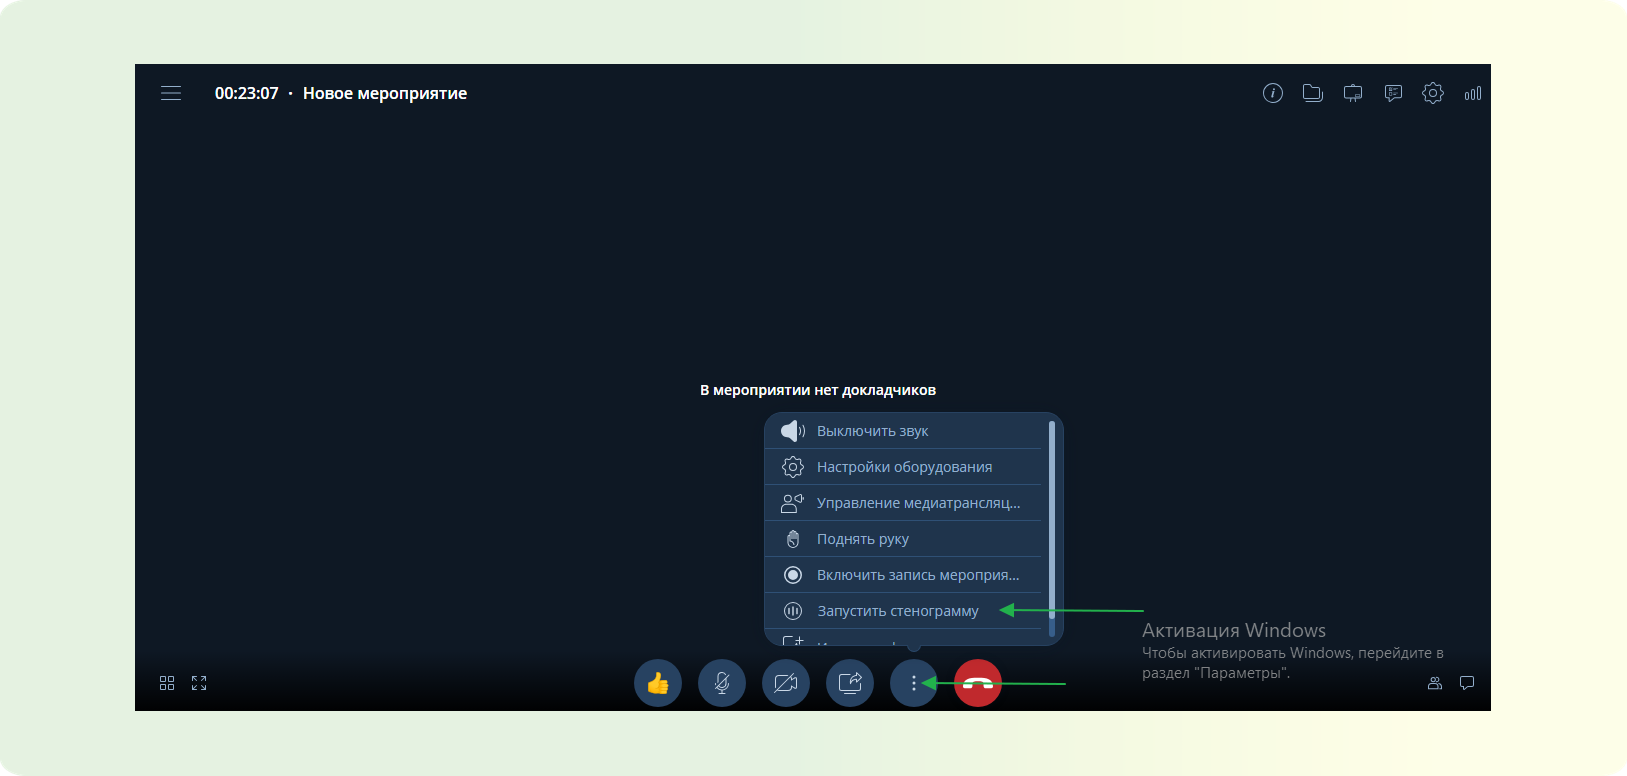
STEP 1: Go to the previously created event. Learn more about creating events of different types in this article. STEP 2: On the lower event management panel, find the three vertical dots. In the list that appears, select "Start stenography."
STEP 3: After enabling stenography, a red circle will appear next to the timer in the upper left corner of the control panel, indicating that stenography is in progress.
METHOD 2: Automatic stenography activation at events.
STEP 1: When creating an event, select the event template with the label "Auto-stenography." Learn more about creating events of different types in this article.
STEP 2: After starting the event, stenography will be automatically enabled. STEP 3: After enabling stenography, a red circle will appear next to the timer in the upper left corner of the control panel, indicating that stenography is in progress.
How to disable stenography at an event and get the file.
You can disable stenography at an event in two ways.
METHOD 1: Automatic stenography disable at the end of the event.
IMPORTANT
This method only works for regular events. And only if the event is ended by the organizer / moderator. Learn more about the available functionality for the organizer / moderator in this article.
STEP 1: On the lower event management panel, find the red "Exit event" button. STEP 2: In the list that appears, click on "End event."
STEP 3: The event will end, stenography will be stopped. Automatic conversion of the stenography file to a text document will begin.
STEP 4: After the conversion is complete, the stenography at the event will be available at the following path: Events - select the desired event in the feed - click on it - click on the "Files" tab - select the necessary document - click the three dots next to the name - download or view.
METHOD 2: Manual stenography file disable.
IMPORTANT
This method works in any type of event. Manual stenography disable is only available to the organizer / moderator. Learn more about the available functionality for the organizer / moderator in this article.
STEP 1: On the lower event management panel, find the three vertical dots. In the list that appears, click on "Disable stenography."

STEP 2: After disabling stenography, the red circle next to the timer in the upper left corner of the control panel will disappear, indicating that stenography has stopped. A corresponding notification will appear in the lower left corner.
STEP 3: Wait for the stenography conversion to finish. STEP 4: After the conversion is complete, the stenography at the event will be available at the following path: In the event, go to the file storage, click on the "Files" button - select the desired recording - click the three dots next to the name - download or view.
How to start a demonstration of the uploaded file
In this article, you will learn how to start and demonstrate the uploaded file at an event.
This function is needed for convenient presentation of slides at events, allowing you to upload files, scale content, and highlight important points with a pointer.
STEP 1: Plan or start the event in the browser. Learn more about planning and starting events in this article.
STEP 2: Access to files
- In the top right corner, click on the "Files" button.

STEP 3: File upload
- In the opened window, "drag" or "upload" the necessary files.
- You can also add files through the "+" functionality in the top left corner of the window.
STEP 4: Wait for the conversion to finish
- Wait for the conversion of the added file to complete.
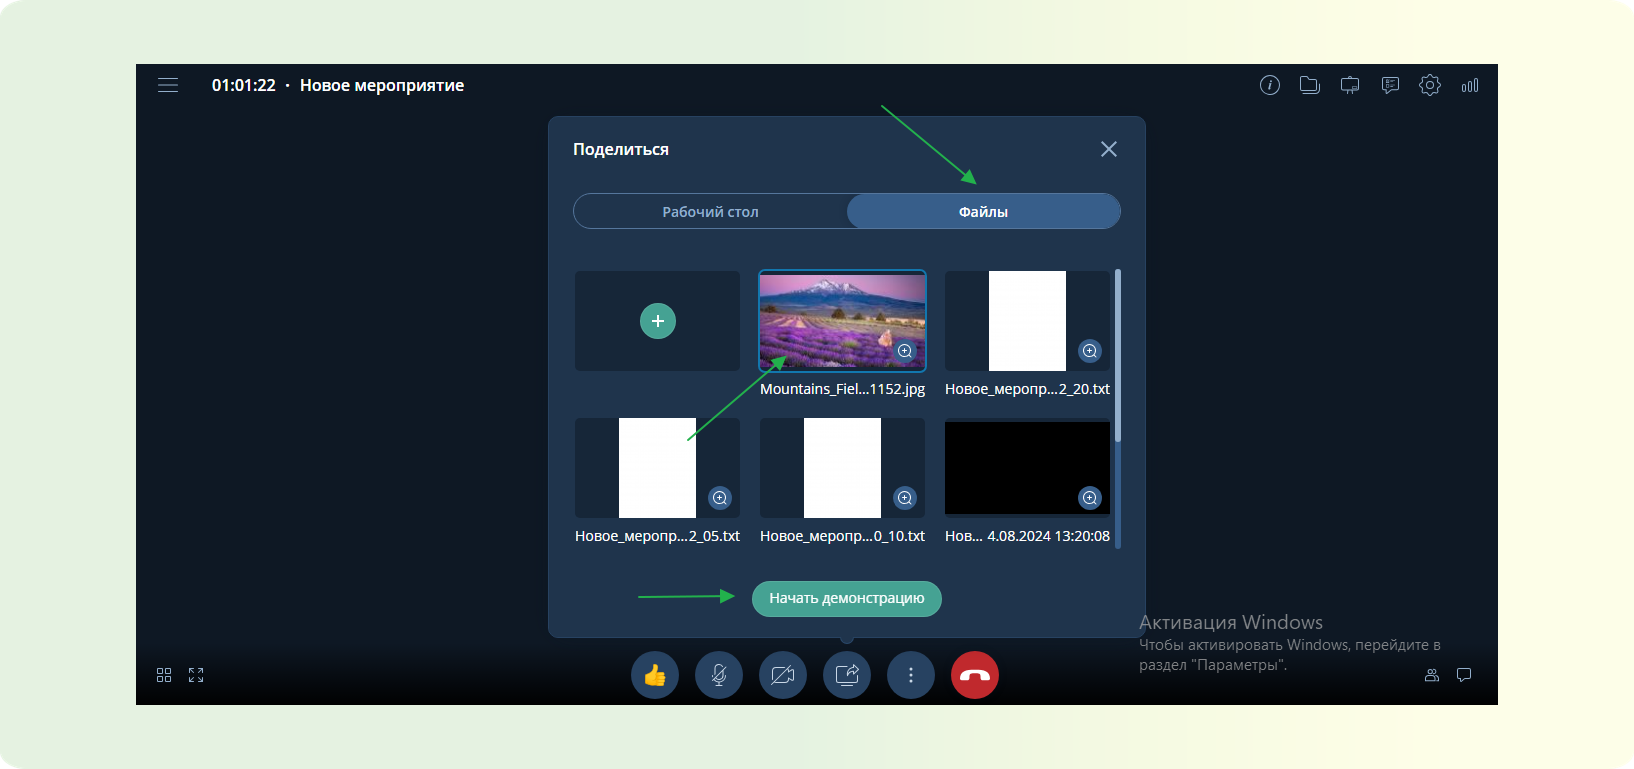
STEP 5: Start the demonstration
- Click on the "Additional content demonstration" icon at the bottom of the screen, then select the "Files" tab, click on the desired file, and "Start demonstration."
STEP 6: Content scaling
- Use the "plus" and "minus" buttons to enlarge or reduce the displayed content.
STEP 7: Fit to screen size
- To scale the content to screen size, use the "to screen size" button.
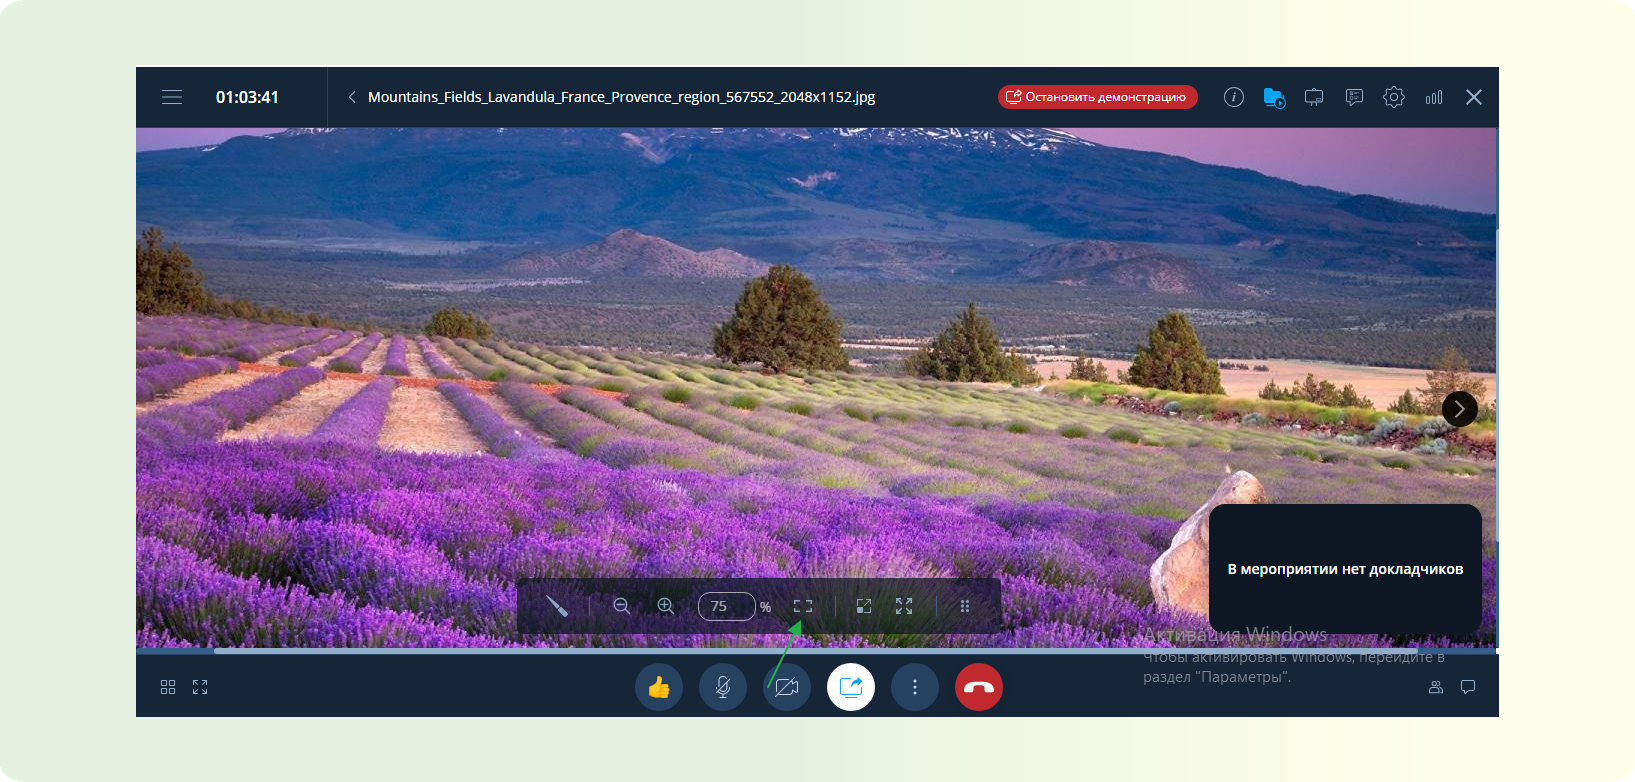
STEP 8: Pointer usage
- During the demonstration, you can use the "pointer" tool to highlight important points.